How to Fix an Annoying Leaky Faucet

A leaky faucet can definitely be annoying, but it can also be very wasteful. According to Popular Mechanics, one drop a second from a faulty faucet sheds 2,300 gallons of wasted water a year. That’s a lot of wasted water! If you have a leaky bathroom or kitchen faucet, the team at Herrmann Services put together this basic tutorial to help you fix it. If you get in over your head, just give us a call.
Causes of Leaky Faucets
Sometimes faucet components get old, calcium buildup causes seals to leak, and seals get brittle and crack. These are fairly easy to rectify with new parts and a little cleaning and replacing. For major leaks, especially behind the wall, or damage to faucets, you’ll want to call one of our professional plumbers to fix the problem.
Related Reads: Is not only your faucet leaking, but your furnace too? See the reasons why here.
Tools Needed for Faucet Repair

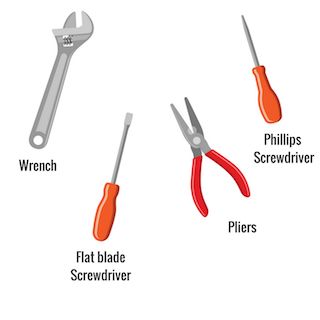
You’ll need the following basic tools:
- A large wrench
- Flat blade screwdriver
- Phillips screwdriver
- Pliers
Kinds of Faucets
Typically, there are two kinds of faucets – washer-type (also referred to as compression) and washerless (non-compression) faucets. Since compression faucets are the most commonly found faucets, that’s what this tutorial will focus on.
Steps to Fix a Compression Faucet
- Turn off the water supply.
- If you have both a cold and hot water type faucet you’ll only need to fix the handle that is leaky. It may be worth fixing them both at once if the leak seems like it’s due to aging parts.
- Remove the handle and take out the faucet components.
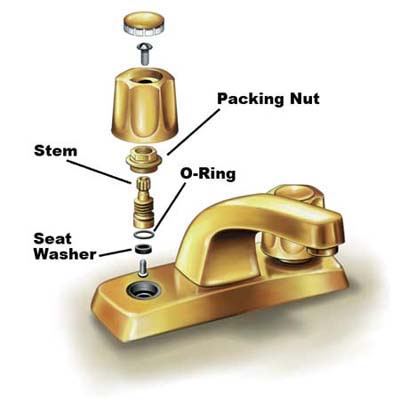
- Remove the handle and unscrew packing nut with an adjustable wrench. Protect nut with tape. Turn the nut counterclockwise.
- After removing the packing nut, unscrew the stem of the faucet by turning it in its “on” direction. It is doable by hand but if it’s hard to turn, remove the handle to get an extra grip on it.
- Usually, just one screw holds the old seat washer to the stem. Remove both the screw and the washer.
- Lift out the old seat washer and fit a new one the same size into the recess. A worn or grooved washer could have caused the leaks. If the screw is corroded, replace it with a new brass one.
And there you have it! You fixed your dripping faucet. Since you just saved gallons of wasted water and restored your faucet to pristine condition, you’ll probably sleep better at night.

